Life in Japan may come with more buttons than you're used to in your home country. Everything seems to have its own set of confusing buttons and some of them even play songs. It can be very confusing, especially if you've come from a very analog country. Select an appliance from the list below or scroll down to see the whole list of common household appliances in Japan and learn how to use them.
Contents
Water Boiler
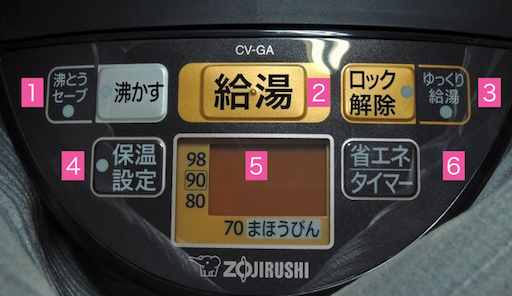
| No. | Japanese | Romaji | Function |
|---|---|---|---|
| 1. | 沸とうセーブ 沸かす | futtou Seebu wakasu | Warm Setting Boil |
| 2. | 給湯 | kyuutou | Pour |
| 3. | ロック解除 ゆっくり給湯 | rokku kaijo yukkuri kyuutou | Unlock Slow Boiling |
| 4. | 保温設定 | ho-on settei | Temperature Settings |
| 5. | まほうびん | mahoubin | Thermos setting |
| 6. | 省エネ タイマー | shouene taimaa | Energy Saver Mode Timer |
Fill water to the fill line. When plugged in, the pot will automatically begin to boil. When the water is ready, a song will play.
Dispensing water from the pot:
- Press the lock button, ③ロック解除 (かいじょ). This will send power to the pour button and allow water to come out.
- To pour, press the Pour button, ②給湯 (きゅうとう).
- If the lock is open for 10 seconds with no activity, the mechanism will re-lock itself.
To boil manually:
To reboil water that is set at a temperature lower than you would like, press the Boil button, ①沸かす. A song will play when the water is ready.
Temperature Settings:
To change your desired temperature settings, press the Temperature Settings button, ④の保温設定. Setting the temperature means that after boiling, the song will not play until the temperature of the boiled water has dropped to your desired temperature.
You can press this button to cycle through the following temperatures:
- 98 degrees: ideal for coffee, black or herbal tea, cup noodles, etc.
- 80 degrees: ideal for green tea, etc.
- 70 degrees: ideal for warming breast milk or formula. まほうびん: ideal for thermoses or other portable bottles or cups made for keeping things hot.
Non-boiling Warm Setting, ①ふっとうセーブコース:
When the indicator light is on, this means that the pot will bring your water up to the selected Temperature Setting without boiling first. This saves time getting your water to the temperature you want. You can press the わかす button to change between the non-boiling setting and the re-boil sequence.
Energy Saver Mode / Timer, ⑥省エネモード/節約タイマー
Energy Saver Mode:
When you don't use your water pot for 2 hours, the pot will reduce the water temperature to 70 degrees to save electricity. You can press the Energy Saver button, ⑥省エネモード to turn this feature on and off.
Timer:
You can set your water pot to boil the water inside anywhere from 4–12 hours from the time you set it. Press the Energy Saver Mode/ Timer button, ⑥省エネモード/節約タイマー to cycle through the times.
Rice Cooker
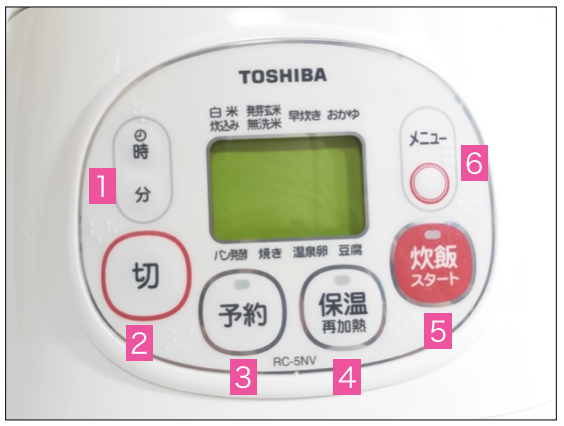
| No. | Japanese | Romaji | Function |
|---|---|---|---|
| 1. | 時 分 | ji fun | Hours Minutes |
| 2. | 切 | kiru | Off |
| 3. | 予約 | yoyaku | Timer |
| 4. | 保温 再加熱 | ho-on saikanetsu | Keep Warm Reheat |
| 5. | 炊飯スタート | suihan start | Cook |
| 6. | メニュー | menyuu | Menu (select) |
| window | 白米 | shirogome | White rice |
| window | 発芽玄米 | hatsuga genmai | Brown rice |
| window | 炊込み | takikomi | Mixed rice |
| window | 無洗米 | musenmai | Pre-washed rice |
| window | 早炊き | hayataki | Quick cook |
| window | おかゆ | okayu | Rice porridge |
| window | パン発酵 | pan hakkou | Cook bread |
| window | 焼き | yaki | Cook |
| window | 温泉卵 | onsen tamago | Boiled eggs |
| window | 豆腐 | toufu | Tofu |
How to Use a Rice Cooker
Making rice:
- Measure out the number of cups of rice you want to make (using the scoop that came with your rice cooker) and put the rice in the bowl of the rice cooker.
- Using cool water, rinse and lightly agitate the rice. Drain the white water. Add more clean water and agitate and drain again. Repeat until the water runs almost clear.
- Drain all water out of the rice, then add clean water to the appropriate fill line. (If you put 1 scoop of rice in the bowl, fill water up to the "1" line under the 白米 marks on the inside of the bowl.)
- Put the bowl back in the rice cooker and close the lid.
- Press the ⑤炊飯スタート button to begin the cook cycle.
- When the rice is finished cooking, a song will play.
- Fluff rice with rice scoop and serve as desired.
Making Rice Porridge:
- Measure out the number of cups of rice you want to make (using the scoop that came with your rice cooker) and put the rice in the bowl of the rice cooker.
- Using cool water, rinse and lightly agitate the rice. Drain the white water. Add more clean water and agitate and drain again. Repeat until the water runs almost clear.
- Drain all water out of the rice, then add clean water to the appropriate fill line. (If you put 1 scoop of rice in the bowl, fill water up to the "1" line under the おかゆ marks on the inside of the bowl.)
- Put the bowl back in the rice cooker and close the lid.
- Press the ⑥メニュー button until the indicator is pointing at おかゆ.
- Press the ⑤炊飯スタート button to begin the cook cycle.
- When the porridge is finished, you can stir in salt or any other seasonings you'd like. You can even stir in a beaten egg for protein. The porridge will be hot enough to cook the egg.
Setting the Timer:
If you want to set your rice cooker to have your rice ready by a certain time, you can set it accordingly.
- Follow Steps 1–4 in the Making Rice section above.
- Press the ③予約 button.
- Set the time you would like the rice to be finished cooking by pressing the ①時 and 分 buttons until you reach the desired time. If your rice cooker has up and down arrows instead of ①時 and 分, press the up and down arrows until you reach the desired time.
- Press the ⑤炊飯スタート button. Your rice cooker will begin the cook cycle when it needs to in order to be finished by the time you set.
Other Cook Settings:
Your rice cooker will have a range of alternative cook settings around the display window. The default is 白米 (white rice). To cycle through the different cook settings, press the ⑥メニュー button until the indicator is pointing at the setting you want. Once the setting is selected, simply put the ingredients into the bowl and press the ⑤炊飯スタート button. You can find many recipes online for these cook settings.
Notes:
Your rice cooker will not shut itself off. When you are finished using it, press the ②切 button to turn your rice cooker off.
If you wish to use any other kind of rice besides white rice, the amount of water needed will vary. Check the back of the rice package for water to rice ratios and washing instructions.
Shower / Bath Control Unit
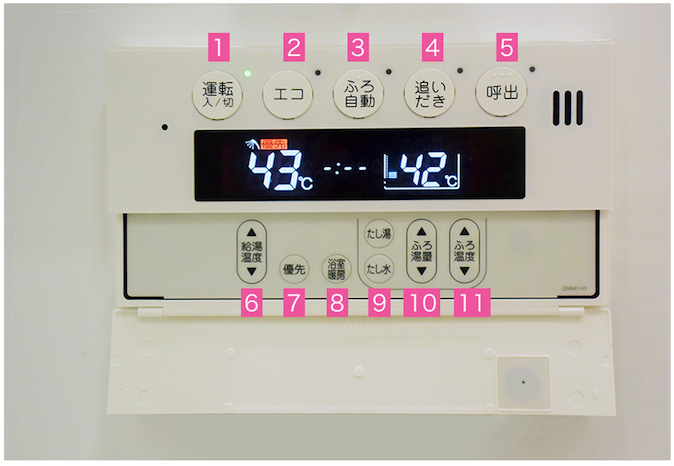
| No. | Japanese | Romaji | Function |
|---|---|---|---|
| 1. | 運転 入/切 | unten iri / kiri | On/Off |
| 2. | エコ | eko | Eco Mode |
| 3. | ふろ自動 | furojidou | Auto Bath Fill |
| 4. | 追いだき | oidaki | Reheat Bath |
| 5. | 呼出 | yobidashi | Call for assistance |
| 6. | 給湯温度 | kyuutou ondo | Shower Temperature |
| 7. | 優先 | yuusen | Priority |
| 8. | 浴室暖房 | yokushitsu danbou | Bathroom Heating |
| 9. | たし湯 たし水 | tashiyu tashimizu | Add hot water Add cold water |
| 10. | ふろ湯量 | furo yuryou | Bath water level |
| 11. | ふろ温度 | furo ondo | Bath water temperature |
Using a Japanese Bath and Shower
Depending on how old your shower is, you may or may not have a standing shower. If your shower head hook is low, you have a sitting shower. This means you will need to invest 100 yen or so into a shower stool. This is for you to sit on while you wash your body in the shower. Be sure to rinse it thoroughly after use, and clean with soap and water once in a while to prevent bacteria and mold growth. There are many different kinds of stools at a variety of price points.
If you have high and low shower head hooks, you can use your shower as a standing shower or a sitting shower.
In Japan, the bathtub is not for washing your body. The bathtub is for relaxation and de-stressing. Therefore, you should never get in your bath with an unwashed body. It is customary to wash your body before soaking in your bath. Feel free to add any bath salts or bath bombs to your soaking bath.
How to Use Control Unit in your Bath
Setting Water Temperature:
In bathrooms with this kind of control unit, you can set the shower temperature, bath temperature, and set priority for the bath temperature.
- Press the ①運転 入/切 button to turn the water heater on.
- Open the bottom panel (if there is one) and press the up and down arrows labeled ⑥給湯温度 until you reach the desired shower temperature.
- If you want this to be the temperature in the shower (and only in the shower), press the ⑦優先 button. This will allow you to set any other control units in the house/apartment (e.g. kitchen) to whatever temperature you'd like without having to change it every time.
Using Auto Bath:
Auto Bath allows you to fill your bathtub to a set water level and temperature with the press of a single button (after initial setup).
- Press the up and down arrows labeled ⑩ふろ湯量 to change the fill level of the bath. A small meter will appear on the screen. Stop pressing when you reach the desired fill level. Your bath will fill to this level every time (unless you change it).
- Press the up and down arrows labeled ⑪ふろ温度 to change the bath water temperature.
- After the above 2 steps are complete, your Auto Bath settings are finished.
- To run your Auto Bath settings, simply press the ③ふろ自動 button. The bath will automatically fill to the level and temperature you have set.
- If you want to reuse the water later, simply place the bath cover over the water (to keep dust out).
- When you are ready to reheat the bath water, press the ④追いだき button. This will cycle out cold water and reinfuse the bath with very hot water to bring it back up to your temperature and water level settings. Do not sit in the bath while this is running, as the water coming out of the pump is VERY hot. A song will play when your bath is ready.
Call for Assistance
If your bathroom control unit has this kind of button (⑤呼出), it is used to send a call for help through the house/apartment.
This is useful if you have an elderly, ill, or disabled person living with or visiting you. If the person needs help for any reason when in the bathroom, they can press the button and an alert will be sent through the speakers of other water control units in your home.
This button will not call the authorities or emergency services.
Bathroom Fan
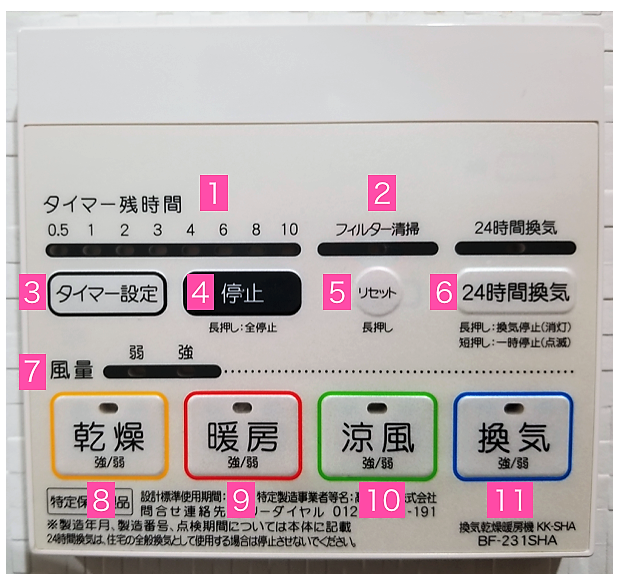
| No. | Japanese | Romaji | Function |
|---|---|---|---|
| 1. | タイマー残時間 | taimaa zanjikan | Time Left (hours) |
| 2. | フィルター掃除 | firutaa souji | Clean Filter |
| 3. | タイマー設定 | taimaa settei | Set Timer |
| 4. | 停止 | teishi | Stop |
| 4. | 長押し:全停止 | nagaoshi : zenteishi | Long press: stop all |
| 5. | リセット | risetto | Reset |
| 5. | 長押し | nagaoshi | Long press (to reset) |
| 6. | 24時間換気 | nijuuyojikan kanki | 24-hour Fan |
| 6. | 長押し:換気停止(消灯) 短押し:一時停止(点滅) | nagaoshi: kanki teishi (shoutou) mijikoshi: ichiji teishi (tenmetsu) | Long press: turn fan off (light off) Short press: pause fan (blinking light) |
| 7. | 風量 | fuuryou | Fan Speed |
| 7. | 弱 強 | jaku kyou | Low High |
| 8. | 乾燥 | kansou | Clothes dryer |
| 9. | 暖房 | danbou | Heating |
| 10. | 涼風 | ryoufuu | Cooling |
| 11. | 換気 | kanki | Dehumidifying fan |
How to Use the Bathroom Fan
Depending on the age of your home, you may or may not have a bathroom fan with all of these functions. The fan is important for controlling moisture levels in your bathroom to prevent mold and steam-ups. It may also be used to heat your bathroom in the winter or even dry your clothes on rainy days or during pollen season.
Dehumidifying Your Bathroom
- To dehumidify your bathroom during or after a shower, press the ⑪換気 button. When you press the button, you may be able to change the fan speed between Low and High (弱 強) by pressing the button again. You can see your current fan speed by checking the ⑦風量 indicator. A light will appear above or below the current fan speed (depending on your unit).
- You can adjust the time you'd like the fan to run by pressing the ③タイマー設定 button until the desired number of hours is selected. The fan will turn off automatically once the time has expired.
- If you need to run your fan 24 hours a day to prevent mold growth, simply press the ⑥24時間換気 button. The fan will run on a low setting and will not turn itself off. If you wish to turn off the 24-hour fan temporarily, press the ⑥24時間換気 button again to pause it, and again to restart it. To turn it off completely, hold down the ⑥24時間換気 button until the fan turns off. Alternatively, press and hold the ④停止 button until the fan shuts off.
Heating & Cooling Your Bathroom
- To heat your bathroom or turn on the cooling fan, press either the ⑨暖房 button or the 涼風 button. Press the button again to change the fan speed.
- You can adjust the time you'd like the fan to run by pressing the ③タイマー設定 button until the desired number of hours is selected. The fan will turn off automatically once the time has expired.
Using the Clothes Dryer in Your Bathroom
The clothes drying setting in your bathroom is designed to dehumidify while it dries your clothing. For this reason, be sure to use the ⑧乾燥 button. If you use the ⑨暖房, the fan will dispense only heat and will not circulate the moisture out of the air. This will cause your bathroom to steam up and your clothes to sour.
- To dry your clothes, press the ⑧乾燥 button. Press the button again to change the fan speed.
- You can adjust the time you'd like the fan to run by pressing the ③タイマー設定 button until the desired number of hours is selected. The fan will turn off automatically once the time has expired.
Filter Cleaning
Your bathroom fan's filter will need to be cleaned periodically. If it goes too long without being cleaned, the ②フィルター掃除 light will blink.
- If your fan is running, press and hold the ④停止 button until the fan has completely turned off.
- Slide the filter out of its fittings.
- Vacuum the dust out of the filter. If it will not vacuum off, soak your filter in warm, soapy water, and clean it with a soft brush or cloth. Rinse thoroughly and allow to dry completely.
- Slide the filter back into its fittings.
- Press and hold the ⑤リセット button until the ②フィルター掃除 light stops blinking.
Notes:
You can set the timer for each of the main fan functions by pressing the function button, and then pressing the ③タイマー設定 button until you reach the desired number of hours. For example, if you press the ⑧乾燥 button and set it to 2 hours, it will automatically set for 2 hours every time you push the ⑧乾燥 button after that. This can be changed at any time.
Your bathroom fan control will likely differ slightly from this one. This tutorial is to give you a general idea of how to use bathroom fans and some of the vocabulary you're likely to encounter.
Interphone
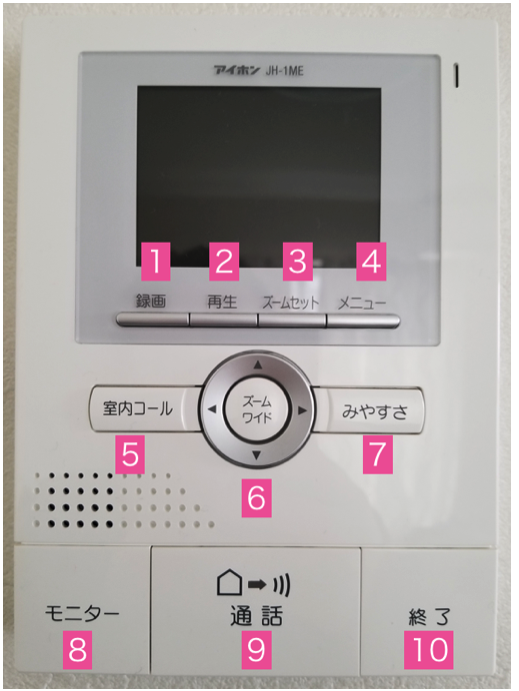
| No. | Japanese | Romaji | Function |
|---|---|---|---|
| 1. | 録画 | rokuga | Record video |
| 2. | 再生 | saisei | Play/Review |
| 3. | ズームセット | zuumu setto | Zoom set |
| 4. | メニュー | menyuu | Menu |
| 5. | 室内コール | shitsunai kooru | Room Call |
| 6. | ズーム | zuumu | Zoom |
| 6. | ワイド | waido | Pan (left, right, up, down) |
| 7. | みやすさ | miyasusa | Visibility |
| 8. | モニター | monitaa | Monitor/On |
| 9. | 通話 | tsuuwa | Call / Talk |
| 10. | 終了 | shuuryou | Off |
| menu | 呼出音の設定 | yobidashi oto no settei | Doorbell sound settings |
| menu | 各種設定 | kakushu settei | Other Settings |
| menu | 時計合わせ | tokei awase | Set Time/Clock |
| menu | 録画画面の設定 | rokuga gamen no settei | Recording Settings |
How to Use an Interphone
If you have an interphone in your home, it likely looks something like the one in the image. Interphones provide you with a level of security, allowing you to see who is at your door without approaching it. It also allows you to see who rang your doorbell while you were out.
Initial Setup
To change the settings on your interphone, press and hold the ④メニュー. The options you see depend entirely on your particular interphone. You may see the following basic settings:
- 呼出音の設定 — Doorbell Sound
- Various doorbell sounds
- 各種設定 — Other Settings
- 時計合わせ — Set Time
- 録画画面の設定 — Recording Settings (how many frames are captured and their zoom)
You can use your interphone's arrow buttons and 決定 button (usually the メニュー button) to navigate through the options and make your selections.
Reviewing Captured Video/Images from Doorbell
- If your ②再生 button is flashing, that means someone has rung your doorbell at some point during the day and there is video for you to review.
- Press the ②再生 button to review the doorbell rings. If more than one person rang your doorbell, you can review the video by pressing the button corresponding to the on-screen >> symbol.
- Press the ⑩終了 button to turn the interphone off when finished.
Recording Video on the Spot
- If you need to record video for any reason (i.e. a strange person at your door, troublesome or illegal activity viewable from your interphone camera, etc), press the ⑧モニター button.
- Press the ①録画 button to begin recording.
- Press and hold the ①録画 button to end recording. The video will be saved on your interphone.
- To review the video you took, press the ②再生 button, and the corresponding ▶ play button. The video will be saved until you delete it or it is pushed out of your interphone's set save limit.
Notes:
Your interphone will likely differ from this one. This tutorial is to give you a general idea of how to use your interphone and some of the vocabulary you're likely to encounter.
Stove / Cooktop
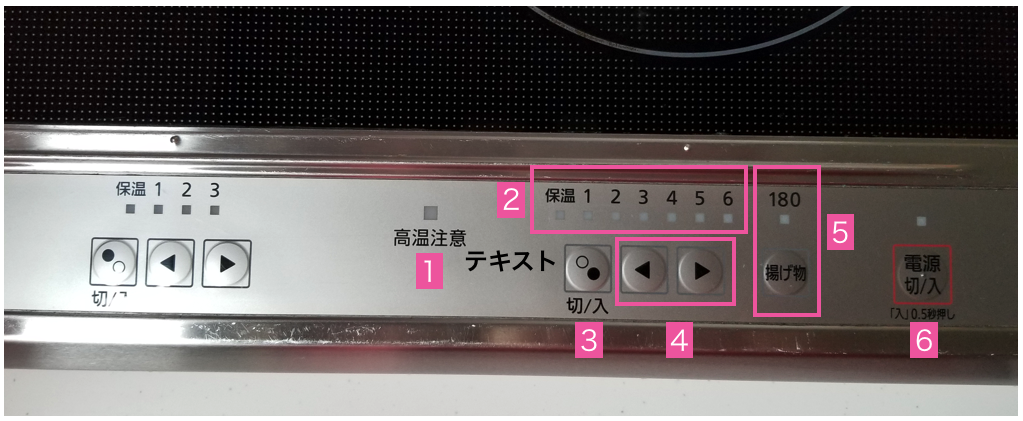
| No. | Japanese | Romaji | Function |
|---|---|---|---|
| 1. | 高温注意 | kou-on chuui | Cooktop is hot |
| 2. | 保温 | ho-on | Keep warm |
| 3. | 入/切 | iri / kiri | Burner On / Off |
| 4. | < > | — | Change heat level |
| 5. | 揚げ物 | agemono | Deep frying |
| 6. | 電源 入/切 | dengen iri / kiri | Power (Stove On / Off) |
How to Use Your Stove
Though gas stoves in Japan are fairly similar to their foreign counterparts, IH glass cooktop ranges are a bit more complicated.
Important note about cookware:
If you have an IH glass cooktop range in your home, you need to buy pots and pans that are designed to be used with IH cooktops. They will say on the packaging whether they are IH compatible or not. Using cookware not designated for IH can damage the cooktop.
Using the Regular Settings:
- Press and hold the ⑥電源 入/切 button.
- Press the ③入/切 of the burner you want to use.
- Press the < > arrows until you reach the desired burner temperature.
- When finished cooking, press the ⑥電源 入/切 button to turn off the stove.
How to Deep Fry
- Place the pot or pan on the burner you want to use, and pour in the appropriate amount of oil.
- Press and hold the ⑥電源 入/切 button.
- Press the ⑤揚げ物 button. The 180 light will blink. When this light is solid, the oil has reached the appropriate frying temperature.
- When you are done frying, press the ⑥電源 入/切 button to turn off the stove.
Notes:
After cooking, if you want to keep your food warm, press the < arrow until 保温 is lit. After you turn the stove off, the ①高温注意 light will flash until the cooktop is safe to touch, at which point it will stop flashing. Your stove will likely differ from this one. This tutorial is to give you a general idea of how to use IH stoves and some of the vocabulary you're likely to encounter.
Washing Machine
Push 入 (On) on the right to turn on. To turn off you can push 切 (Off).
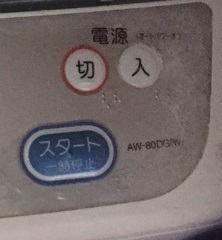
| Japanese | Romaji | Function |
|---|---|---|
| 電源 (でんげん) | dengen | Power |
| 入 (いり) | iri | On |
| 切 (きり) | kiri | Off |
| スタート | sutaato | Start |
| 一時停止 (いちじていし) | ichijiteishi | Pause |
You can choose the cycle by pushing Course (コース) until the desired cycle is lit up.
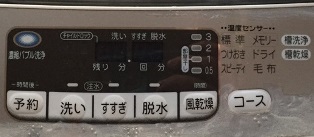
| Japanese | Romaji | Function |
|---|---|---|
| 標準 (ひょうじゅん) | hyoujun | Standard |
| つけおき | tsukeoki | Soak |
| スピーディー | supiidi | Quick Wash |
| メモリー | memori | Save a custom setting |
| 毛布 (もうふ) | moufu | Blanket |
| 予約 (よやく) | yoyaku | Auto Wash Timer (set number of hours to load finish) |
| 洗い (あらい) | arai | Wash |
| すすぎ脱水 (すすぎだっすい) | susugi | Rinse |
| 脱水 (だっすい) | dassui | Spin |
| 風乾燥 (かんそうき) | kazekansou | Air Fluff |
| コース | koosu | Course/Cycle |
The default setting is a Standard (標準) cycle. To customize your load, press each the Wash (洗い), Rinse (すすぎ), and Spin (脱水) buttons to the desired wash length, number of rinses, and length of spin, respectively.
Press Start (スタート)
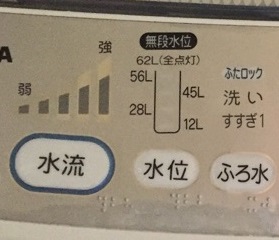
| Japanese | Romaji | Function |
|---|---|---|
| ふろ水 (ふろみず) | furomizu | Bath water |
| 水位 (すいい) | suii | Water level |
| 水流 (すいりゅう) | suiryuu | Washing strength |
| 弱 (じゃく) | jaku | Gentle |
| 強 (きょう) | kyou | Strong |
Most washing machines will weigh the contents of the drum by spinning it a few times, and then automatically dispense the appropriate amount of water.
If you disagree with the machine's calibration, you can change the water level by pressing the Water Level (水位) button until the desired liter amount is lit. Then, put in the appropriate amount of soap for the amount of water your machine will use, and close the lid.
If you need to stop the machine for any reason, press the Pause (一時停止) button. This will stop the machine and unlock the lid.
Washlet Toilet
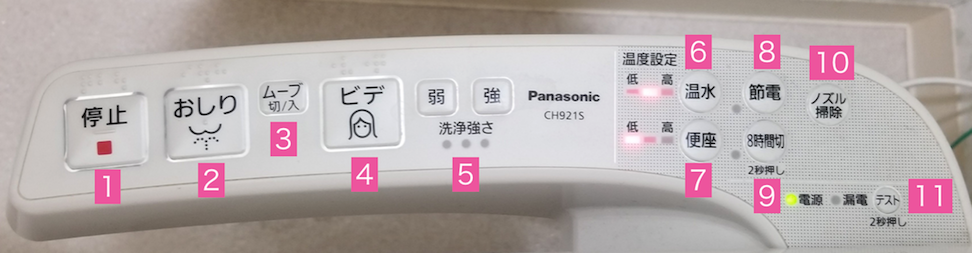
| No. | Japanese | Romaji | Function |
|---|---|---|---|
| 1. | 停止 | teishi | Stop |
| 2. | おしり | oshiri | Rear |
| 3. | ムーブ 切 / 入 | muubu kiri / iri | Move On / Off |
| 4. | ビデ | bide | Feminine wash |
| 5. | 洗浄強さ 弱 強 | senjou tsuyosa jaku kyou | Water pressure weaker stronger |
| 6. | 温水 低 高 | onsui tei kou | Water warmth Low High |
| 7. | 便座 低 高 | benza tei kou | Seat warmth Low High |
| 8. | 節電 | setsuden | Eco setting |
| 9. | 8時間切 | hachijikan kiri | 8-hour shut off |
| 10. | ノズル掃除 | nozuru souji | Nozzle cleaning |
| 11. | テスト 2秒押し | tesuto nibyou oshi | Test Press for 2 seconds |
Setting Up your Washlet
Water Warmth
Before using your washlet's bidet function, it's recommended to set up the water warmth. If this is left unset, the water that comes out of the nozzle will be quite cold.
- Locate the ⑥温水 button on your control unit.
- If there is no indicator light on, press the button to turn on the water heater.
- Press the button until you reach the desired warmth, from Low (低) to High (高). If you're not sure how warm you'd like it, set it to the lowest heat and go from there depending on your preference and heat tolerance.
- Allow the washlet a few hours to warm up the water before using the bidet function for the first time.
Seat Warmer
If you want your toilet seat warm:
- Locate the ⑦便座 button on your control unit.
- If there is no indicator light on, press the button to turn the seat warmer on.
- Press the button until you reach the desired warmth, from Low (低) to High (高). If you're not sure how warm you'd like it, set it to the lowest heat and go from there depending on your preference and heat tolerance.
- The seat will take a little while to heat up to your desired temperature.
Using the Bidet
- With your rear seated fully on the toilet seat, press the button of the type of wash you'd like: rear wash ②おしり or feminine wash ④ビデ. If you'd like the nozzle to move forwards and back for a more thorough cleaning, press the ③ムーブ. To turn off the movement, press the button again.
- To increase or decrease water pressure from the nozzle, press the 低 or 強 by ⑤洗浄強さ. The indicator light will let you know how high the water pressure is set.
- When you are finished washing, press the ①停止 button.
Other Functions
Nozzle Cleaning
You should periodically press the ⑩ノズル掃除. This will cause the nozzle to extend and a gentle stream of water to run out of it. You can take this opportunity to wipe it of any dirt. When you are finished cleaning the nozzle, let the water run out of it for a few more seconds and then push the ⑩ノズル掃除 button again to return the nozzle to its normal state.
Functions regarding electricity
⑧節電: This sets the washlet to a low-power mode, saving electricity.
⑨8時間切: This turns the water and seat heating off for 8 hours from the time you press the button. This is useful if you are trying to save electricity, and is great for while you are away at work or school.
⑪テスト: In the event of a power outage, hold this button down for 2 seconds when the power comes back.
Another common variety of control unit
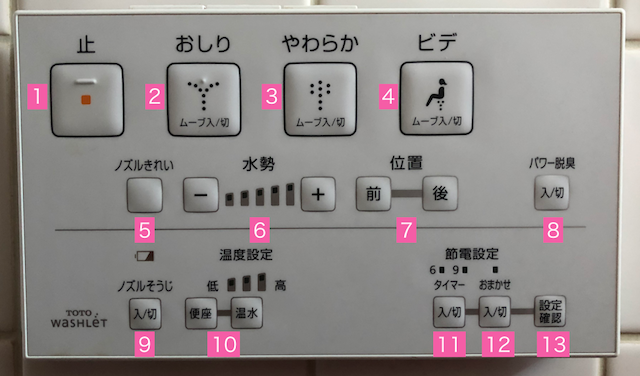
| No. | Japanese | Romaji | Function |
|---|---|---|---|
| 1. | 止 | tome | Stop |
| 2. | おしり ムーブ入/切 | oshiri muubu iri/kiri | Rear wash Move On/Off |
| 3. | やわらか ムーブ入/切 | yawaraka muubu iri/kiri | Gentle wash Move On/Off |
| 4. | ビデ ムーブ入/切 | bide muubu iri/kiri | Feminine wash Move On/Off |
| 5. | ノズルきれい | nozurukirei | Quick nozzle rinse |
| 6. | 水勢 | suisei | Water pressure |
| 7. | 位置 前 後 | ichi mae ushiro | Position Forward Back |
| 8. | パワー脱臭 | pawaa dasshuu | Deodorizing |
| 9. | ノズル掃除 入 / 切 | nozuru souji iri / kiri | Nozzle cleaning On / Off |
| 10. | 温度設定 便座 温水 | ondo settei benza onsui | Temperature settings Seat warmer Water warmth |
| 11. | 節電設定 タイマー 入 / 切 | setsuden settei taimaa iri / kiri | Eco setting Timer On / Off |
| 12. | おまかせ | omakase | Automatic setting |
| 13. | 設定確認 | settei kakunin | Setting confirmation |
Water Warmth
Before using your washlet's bidet function, it's recommended to set up the water warmth. If this is left unset, the water that comes out of the nozzle will be quite cold.
- Locate the ⑩温水 button on your control unit.
- If there is no indicator light on, press the button to turn on the water heater.
- Press the button until you reach the desired warmth, from Low (低) to High (高). If you're not sure how warm you'd like it, set it to the lowest heat and go from there depending on your preference and heat tolerance.
- Allow the washlet a few hours to warm up the water before using the bidet function for the first time.
Seat Warmer
If you want your toilet seat warm:
- Locate the ⑩便座 button on your control unit.
- If there is no indicator light on, press the button to turn the seat warmer on.
- Press the button until you reach the desired warmth, from Low (低) to High (高). If you're not sure how warm you'd like it, set it to the lowest heat and go from there depending on your preference and heat tolerance.
- The seat will take a little while to heat up to your desired temperature.
Using the Bidet
- With your rear seated fully on the toilet seat, press the button of the type of wash you'd like: rear wash ②おしり, gentle rear wash ③やわらか, or feminine wash ④ビデ. If you'd like the nozzle to move forwards and back for a more thorough cleaning, press the button again. To turn off the movement, press the button a final time.
- To increase or decrease water pressure from the nozzle, press the + or − buttons by the ⑥水勢 label. The indicator light will let you know how high the water pressure is set.
- When you are finished washing, press the ①止 button.
Other Functions
Nozzle Cleaning
You should periodically press the 入/切 button under ⑨ノズル掃除. This will cause the nozzle to extend and a gentle stream of water to run out of it. You can take this opportunity to wipe it of any dirt. When you are finished cleaning the nozzle, let the water run out of it for a few more seconds and then push the 入/切 button under ⑨ノズル掃除 again to return the nozzle to its normal state.
Eco Mode
Eco Mode allows you to save electricity by setting it to a low-power mode.
- To turn on Eco Mode, press the タイマー 入/切 button under ⑪節電設定.
- Press the ⑬設定確認 until you reach the desired number of hours. (This is the number of hours until the unit turns back on.)
- Alternatively, press ⑫おまかせ to turn on an automatic setting.
- Press the 入/切 to cancel or turn off Eco Mode.
Deodorization
If you press the 入/切 button beneath the パワー脱臭 label, it will activate the deodorizer. Press the button again to turn it off.
Flushing
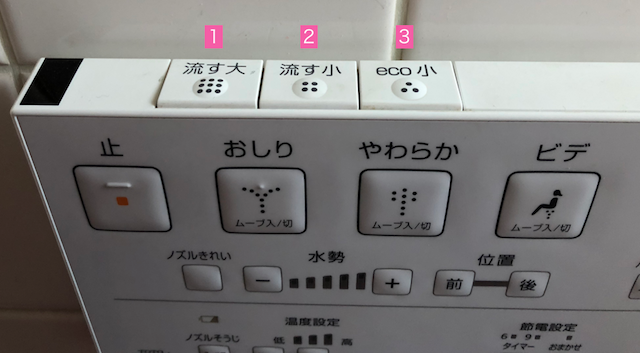
| No. | Japanese | Romaji | Function |
|---|---|---|---|
| 1. | 流す 大 | nagasu dai | Large flush |
| 2. | 流す 小 | nagasu shou | Low-flow flush |
| 3. | eco 小 | eko shou | Eco small flush |
Flush Types
Modern Japanese toilets often have options for flushing in order to save water. Simply press the appropriate button for the flush you'd like.
①流す 大 is recommended for bowel movements or times when you require a lot of toilet paper (e.g. menstruation).
②流す 小 is recommended for urination and small amounts of toilet paper.
③eco 小 is recommended for very small amounts of urine and toilet paper, such as when children use the toilet.